
Beginner Guide to Crypto Wallet Setup
Step-by-step crypto wallet setup: choose hot or cold, back up your seed offline, test with a small transfer, and secure keys.
One setup mistake can cost you your crypto for good. I’d keep it simple: pick the right wallet, back up your recovery phrase offline, send a small test first, and never share your private key or seed phrase with anyone.
Here’s the short version:
- A crypto wallet does not hold coins on your phone or laptop. It controls access to funds on the blockchain.
- Your public address is for receiving crypto.
- Your private key and recovery phrase give full control of your wallet. If someone gets them, your funds are at risk.
- Hot wallets are online and better for small spending amounts.
- Cold wallets keep keys offline and are better for larger balances.
- Start with a $5 to $20 test transfer before sending more.
- Keep your recovery phrase in two offline places. Never store it in screenshots, email, cloud storage, or notes apps.
- Turn on app-based 2FA, use long passwords, and keep your phone, computer, and wallet app updated.
A few numbers show why this matters:
- An estimated 2.3 to 3.8 million BTC may be lost due to missing keys or seed phrases.
- 21% of crypto holders in one U.S. study said lost seed phrases caused lost access.
- In 2024, private key compromise made up 43.8% of stolen crypto value.
- In 2023, the FBI reported more than $5.6 billion in crypto fraud losses.
If I were starting today, I’d use a non-custodial wallet for a small amount, learn with test transactions, and move larger holdings to a hardware wallet once the balance felt like money I could not afford to lose.
| Topic | What I’d focus on |
|---|---|
| Wallet type | Hot wallet for small use, hardware wallet for larger storage |
| Backup | Write the recovery phrase on paper and store two offline copies |
| First transfer | Send a small test amount first |
| Login security | Long password, app-based 2FA, secure email |
| Main risks | Phishing, fake apps, wrong network, bad backups |
That’s the whole idea: keep setup simple, keep backups offline, and check every detail before you send.
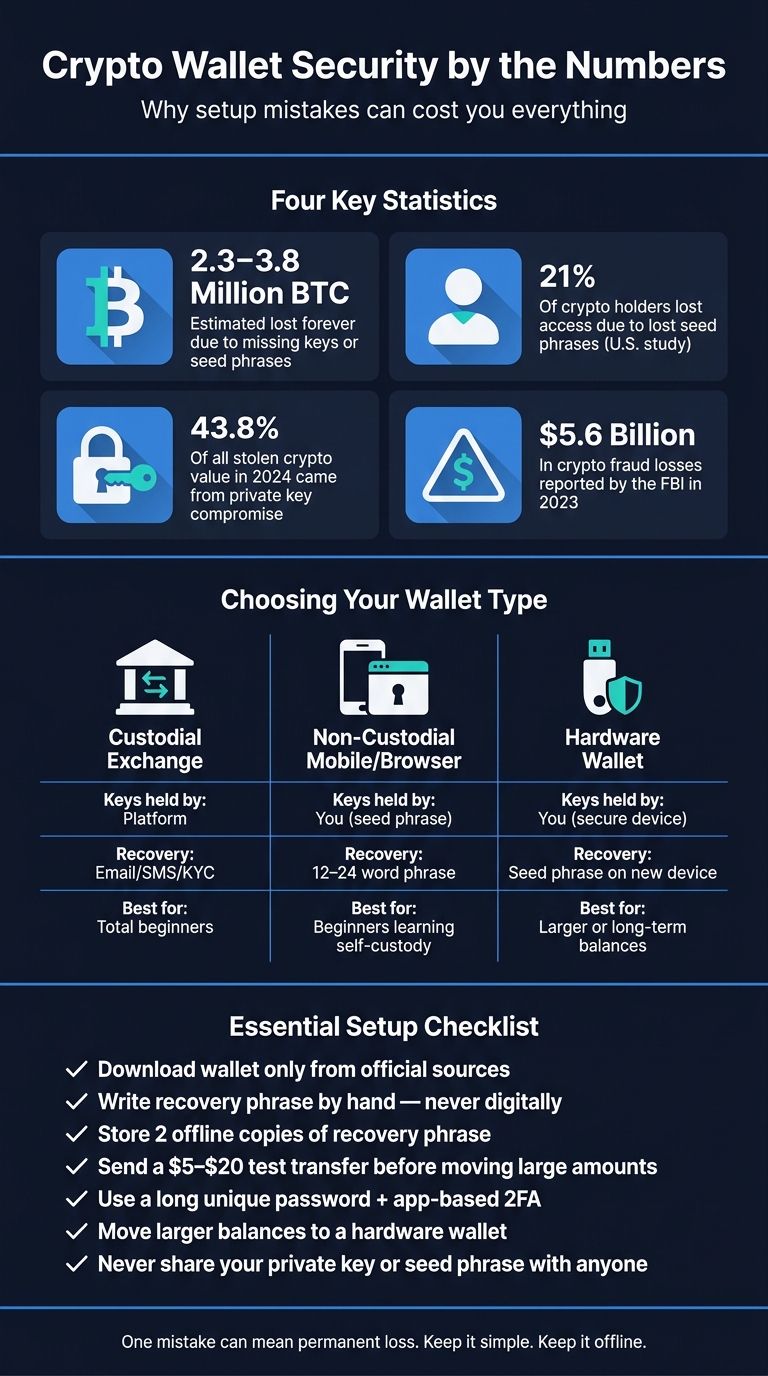
Crypto Wallet Security: Key Stats & Risks at a Glance
How to Choose the Right Wallet for Your First Setup
Now that you know the difference between hot and cold storage, the next step is custody. Put simply: who controls the keys? Is it you, or is it a platform? After that, make sure the wallet supports the coins, networks, and devices you plan to use.
Custodial vs. Non-Custodial Wallets: Who Controls Your Keys
With a custodial wallet, the platform holds your keys. If you forget your login, recovery usually happens through email, SMS, or identity checks. That can feel easier when you're just getting started. But there's a trade-off: you're trusting that platform's security and rules with your money.
With a non-custodial wallet, you control the keys yourself and back them up with a recovery phrase. That gives you more control, but also more responsibility. If you lose the phrase, access is gone.
| Wallet model | Who holds keys | Recovery options | User responsibility | Best fit for beginners |
|---|---|---|---|---|
| Custodial exchange account | Platform (custodian) | Email/SMS login reset, KYC-based support verification | Strong password, 2FA, phishing awareness | Very new users making first purchases |
| Non-custodial mobile/browser | User (via seed phrase) | Restore using 12–24 word recovery phrase | Offline seed backup, device security, app updates | Beginners ready to learn self-custody |
| Hardware wallet | User (secure device keys) | Restore via recovery phrase on new hardware | Long-term phrase storage, physical device care | Users with growing or long-term balances |
Before you commit, double-check the basics. A wallet might look good on paper and still be a bad fit if it doesn't support the coin you want or the network you plan to use. It also needs to work on your phone, browser, or desktop setup.
A Simple Starting Path for Small and Large Balances
A simple way to start is with a non-custodial mobile or browser wallet. Send in a $5 to $20 test amount first, then practice receiving and sending. That small test can save you from a much bigger mistake later.
As your balance starts to feel like money you'd hate to lose, move most of it to a hardware wallet. Then keep only a small spending amount in your hot wallet, kind of like carrying cash in your pocket while the rest stays locked away.
Once you pick a wallet type, you can move on to the setup and first test transfer.
sbb-itb-0796ce6
How to Set Up Your First Crypto Wallet Step by Step
Once you've picked a wallet type, setup is pretty simple. Still, a few steps matter A LOT.
Software Wallet Setup: From Official Download to First Test
Start with the official source. Then back up the recovery phrase before you move any funds.
Go straight to the wallet's official website or a verified app store listing. Never install a wallet from a link sent in a DM, forum post, or email.
After installation, choose "Create new wallet", not "Import." That gives you a new wallet under your control. Set a long, one-of-a-kind password, and don't reuse the one tied to your email or bank account.
Write the recovery phrase by hand, in the correct order, on paper. Keep it offline in a home safe or a bank safety deposit box. Two paper copies in separate places can work even better. A U.S. study found that 21% of crypto holders said lost seed phrases caused lost access. Don't take a screenshot. Don't save it in a notes app. Finish the in-app check so you know the backup is correct.
Next, find your wallet's receive address for the exact asset and network you plan to use. Copy it with care or scan the QR code. Then check the first and last characters before sending.
Your first transfer is just a safety check. Send a $5 to $20 test transfer from a regulated platform like Kryptonim before moving more. Wait for confirmation, then make sure the balance shows up in your wallet. Only send larger amounts after that test goes through without a problem.
Hardware Wallet Setup for Long-Term Storage
If you're storing a larger balance, follow the same backup rules, but set up the wallet on the device itself.
Hardware wallets use the same basic flow, but the keys stay on the device. Buy straight from the manufacturer or an authorized reseller. Stay away from secondhand marketplaces. When the device arrives, inspect the packaging for tamper indicators before opening it.
Set up the wallet on the device, not on your computer. That keeps the private keys inside the hardware from the first moment. The device will generate and show your recovery phrase on its own screen. Write it down the same way you would with a software wallet. Then create a PIN that isn't your birthday or an easy sequence like 1234.
After that, install the manufacturer's official companion app from the manufacturer's website. Use it for updates and managing transactions. Some people connect their hardware wallet to a software interface for day-to-day use, but the actual transaction signing still happens on the hardware device. If malware is sitting on your computer, it still can't approve a transfer without confirmation on the device.
Before moving any large amount, do a small test send and receive. Check the amount, asset, and destination address on the hardware device screen - not just on your computer - before you approve anything. That last visual check on the device is your best guard against anything trying to change transaction details behind the scenes.
How to Protect the Details That Keep Your Wallet Secure
Once your wallet is set up, the next job is simple in theory and easy to mess up in practice: protect the details that keep access in your hands. That means your recovery phrase, private keys, and linked accounts. These are the pieces that matter after your first transfer goes through. In 2024, private key compromise accounted for 43.8% of all stolen cryptocurrency value.
What to Store Offline and What to Never Save Digitally
Your recovery phrase and private keys should stay offline. No exceptions.
Keep two copies of your recovery phrase:
- One in a home fireproof safe
- One in a bank safe-deposit box or another secure offsite location
If you hold a larger balance, metal backup plates are worth a look. Paper burns, gets wet, and falls apart. Metal holds up better against fire and water.
Your wallet password or PIN is different. It only unlocks the wallet app or device on a certain phone or computer. That means passwords can live in a reputable password manager. Recovery phrases cannot.
Do not save your recovery phrase in any of these places:
- A phone screenshot
- An email draft
- Google Drive
- iCloud
- Dropbox
- A notes app
- A plain text file
If someone gets into your email, they can often reach connected cloud storage too. One weak point can open the whole door.
Device Security, App Updates, and Basic Account Hygiene
Even a good backup won't help much if your device is wide open. And wallet security doesn't stop at the wallet itself. Your email and exchange accounts matter too, since email handles resets, alerts, and cloud access.
| Item to Protect | What It Is | Where It Should Be Stored | Never Do This |
|---|---|---|---|
| Recovery phrase (seed phrase) | 12–24 words that restore full wallet access | Written by hand on paper or stored on metal, in two separate offline locations | Screenshot it, email it, or save it in cloud notes or a text file |
| Private key | Cryptographic key tied to your wallet address | Offline only | Type it into any website, share it in a chat, or store it digitally |
| Wallet password / PIN | Unlocks the wallet app or hardware device | Password manager for passwords; memorized or written separately for PINs | Reuse it across accounts or set it to an obvious sequence like 1234 |
| Exchange / platform login | Access to accounts where you buy crypto | Password manager, protected by app-based 2FA | Use SMS-only 2FA or reuse passwords from other sites |
| Email account | Recovery hub for most online accounts | Strong unique password plus app-based 2FA | Leave it without 2FA or share login credentials |
Set a PIN or passcode on every phone or computer you use for your wallet. Turn on biometrics if the device supports them. Enable disk encryption too. It comes built into most newer smartphones and is available on Windows and macOS.
Also, stay away from rooted or jailbroken devices. They can weaken the barriers that keep apps separated from each other.
Updates matter more than most people think. Keep both your wallet apps and your operating system current, since updates patch security holes that attackers look for and use. NIST recommends 15+ character passwords and app-based 2FA instead of SMS. Use both for your email and any exchange accounts tied to your crypto.
Run this check once a month. Small habits here can save a lot of money later.
Common Beginner Mistakes and the Safest Next Steps
Mistakes That Lead to Lost Access or Stolen Funds
Once your wallet is set up, the biggest dangers are pretty simple: phishing, bad backups, and sending funds to the wrong place. And the cost can be brutal. In 2023, the FBI's Internet Crime Complaint Center reported more than $5.6 billion in losses from cryptocurrency fraud. On top of that, phishing scams that drain wallets stole about $295.5 million from more than 324,000 victims.
Here are the mistakes that trip up many beginners:
| Mistake | Risk | Simple Fix |
|---|---|---|
| Downloading fake wallet apps or visiting phishing sites | Seed phrase theft and complete loss of funds | Only use official project links; verify the publisher name and long-term reviews in the app store |
| Storing seed/recovery phrase digitally | Exposure via hacks, malware, or account takeover | Write it by hand and store it offline in two secure physical locations |
| Reusing weak or breached passwords | Wallet apps and linked accounts compromised via credential stuffing | Use unique, strong passphrases with a password manager; enable app-based 2FA |
| Sending to the wrong address or wrong network | Irreversible loss; recovery is rarely possible | Copy-paste addresses, confirm the network matches on both ends, and never type manually |
| Skipping a small test transfer | Losing a large amount due to an unnoticed address or network error | Send $1–$5 first, confirm it arrives, then send the rest |
| Keeping all funds in a single hot wallet | Entire balance at risk if the device is compromised or stolen | Keep only small, active amounts in a hot wallet; move larger holdings to cold storage |
One scam worth calling out is address poisoning. In this setup, scammers send tiny lookalike transactions so their address shows up in your wallet history. Later, if you copy the wrong past transaction, you can end up sending funds straight to them.
How to Use Your Wallet Address When Buying Crypto
After you know where things usually go wrong, using your receive address gets much easier. The process is short. Open your wallet, pick the asset, and tap Receive to show your wallet address and QR code. Then check that the network matches on both sides before you paste the address. From there, copy-paste the address or scan the QR code right into the checkout flow.
When buying crypto with fiat, Kryptonim lets you enter your own wallet address at checkout and send crypto straight to your wallet.
FAQs
What happens if I lose my recovery phrase?
If you lose your recovery phrase, you lose access to your funds for good. There’s no support team to call and no password reset that can get you back in.
Your cryptocurrency still exists on the blockchain. But without the recovery phrase - the master key tied to your private keys - you can’t reach it anymore.
That’s why storing your phrase the right way matters so much. Keep physical backups in secure, offline places, and never share your phrase.
How do I know which network to use?
Match the network shown for the asset you’re buying with the network your wallet supports. Also check that the address type fits that network.
For example, USDC exists on more than one network. Before you submit, double-check both the selected network and the recipient address in your wallet. If you send it on the wrong network, you could lose the funds for good.
When should I switch to a hardware wallet?
Switch to a hardware wallet when you plan to hold crypto for the long haul or when your balance gets big enough that security matters more than convenience.
A hardware wallet keeps your private keys offline. That puts a stronger barrier between your funds and threats like malware or hacking. A common setup is simple: keep a small amount in a hot wallet for day-to-day use, and store the bulk of your crypto in cold storage.