
How to Choose the Right Network When Buying Stablecoins
Choose the correct network before buying stablecoins—match deposit labels, compare fees, have gas tokens, and send a small test.
Pick the receiving network first. If the wallet or exchange accepts only ERC-20, TRC-20, BEP-20, SPL, or Polygon, your purchase and transfer must match that exact network. If it doesn’t, your funds can get stuck or be lost.
Here’s the short version I’d follow every time:
- Check the deposit page first for the exact stablecoin and supported network
- Match the network name exactly, not just the coin ticker
- Use address format only as a quick check
0x= Ethereum-style chains like Ethereum, BNB Smart Chain, and PolygonT= Tron- long alphanumeric string = Solana
- Compare fees before buying
- Ethereum: often $1.50 to $9.00, sometimes more when busy
- Tron: often $0.01 to $1.20
- BNB Smart Chain: often $0.03 to $0.30
- Solana: often under $0.01
- Polygon: often $0.01 to $0.05
- Keep the gas token ready: ETH, TRX, BNB, SOL, or POL
- Send a small test first, usually $1 to $5
- Add a memo or tag if the receiving platform asks for one
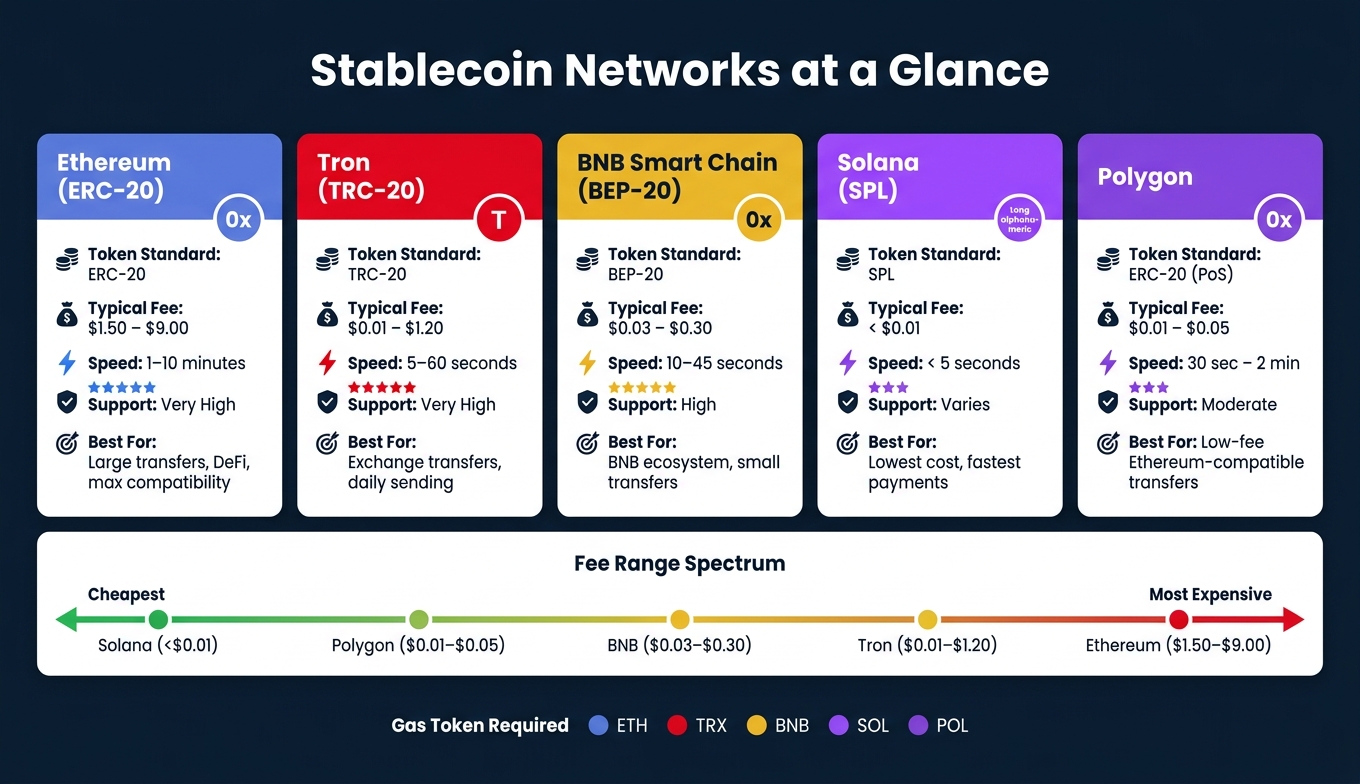
Quick Comparison
| Network | Typical Fee | Usual Speed | Common Use |
|---|---|---|---|
| Ethereum (ERC-20) | $1.50–$9.00 | 1–10 minutes | DeFi, large transfers, high support |
| Tron (TRC-20) | $0.01–$1.20 | 5–60 seconds | Exchange transfers, daily sending |
| BNB Smart Chain (BEP-20) | $0.03–$0.30 | 10–45 seconds | BNB ecosystem, small transfers |
| Solana (SPL) | < $0.01 | < 5 seconds | Low-cost, fast payments |
| Polygon | $0.01–$0.05 | 30 seconds–2 minutes | Low-fee Ethereum-style transfers |
My rule is simple: start with the destination, match the network, check the fee, then send a test amount. That one process helps avoid the three mistakes that cost beginners money: wrong-network sends, high fees, and missing memo/tag details.
sbb-itb-0796ce6
Check Where the Stablecoins Are Going Before You Buy
Before you buy, check the destination wallet or exchange first. Then pick only a network that the destination supports. If it supports more than one chain, compare the fees and wallet support before you make the purchase.
Match the Network to the Receiving Wallet or Exchange
Open the destination platform and go to the Deposit or Receive section. Choose the exact stablecoin you want to send, then check which networks that platform accepts. You should see clear labels like ERC-20, TRC-20, BEP-20, or SPL.
This part matters more than many people think. A lot of chains use addresses that start with 0x, so you can't rely on the address format alone. Check the network label shown on the deposit page. Solana is different here, with a long alphanumeric address format.
You should also check whether the platform asks for a Memo or Destination Tag. Some exchanges need that extra detail, and leaving it out can stop the funds from arriving the right way.
Copy the address or scan the QR code. Never type it by hand.
Choose Based on Your Use Case, Not Just the Ticker
Pick the network based on where the stablecoins need to go next, not just the token symbol.
| Use Case | Recommended Network | Why |
|---|---|---|
| Exchange transfers | TRC-20 | Widely supported and typically low cost |
| Holding or using DeFi protocols | ERC-20 or Arbitrum | Deep liquidity and mature DeFi support |
| Daily payments or remittances | Solana (SPL) | Very low fees and fast settlement |
| BNB Smart Chain transfers | BEP-20 | Seamless integration and very low fees |
Make sure your wallet supports the network you picked. If you're sending to a new address, send a $1 to $5 test first.
When more than one network works, fee and speed are usually what tip the scale.
Compare the Main Stablecoin Networks by Fees and Support
Stablecoin Networks Compared: Fees, Speed & Best Use Cases
If more than one network will work, compare fees, speed, and platform support before you send anything. A network that looks cheap on paper can still be the wrong pick if your destination doesn’t accept it.
Here’s a quick side-by-side view of the most common options.
| Network | Token Standard | Typical Fees (USD) | Transfer Speed | Wallet & Exchange Support | Best For |
|---|---|---|---|---|---|
| Ethereum | ERC-20 | $1.50 – $9.00 | 1–10 minutes | Very High | Large transfers, DeFi, high compatibility |
| Tron | TRC-20 | $0.01 – $1.20 | 5–60 seconds | Very High | Routine exchange transfers, daily use |
| BNB Smart Chain | BEP-20 | $0.03 – $0.30 | 10–45 seconds | High | Small transfers, BNB ecosystem |
| Solana | SPL | <$0.01 | <5 seconds | Varies by platform | Maximum speed, lowest cost |
| Polygon | ERC-20 (PoS) | $0.01 – $0.05 | 30 sec – 2 min | Moderate | Low-cost Ethereum-compatible transfers |
Use this table to narrow down your options, then double-check that the destination supports the network you picked.
Ethereum vs. Tron: Broad Compatibility vs. Lower Transfer Costs
Ethereum’s ERC-20 standard has the broadest support across exchanges, wallets, and DeFi apps. That’s the big draw. If a platform supports only one stablecoin network, ERC-20 is often the one you’ll see.
The trade-off is cost. Fees usually land between $1.50 and $9.00 per transfer, and during busy periods they can go above $20. In plain English: ERC-20 is often the safer choice for compatibility, but not always the cheapest one. It tends to make more sense when the receiving platform specifically asks for ERC-20 or when you’re sending a large amount and the fee is small compared with the total.
Tron’s TRC-20 is often the go-to option for routine USDT transfers between exchanges. Fees are usually just a few cents and are often under $1.20. It’s also faster in most cases, with confirmations that usually take seconds instead of minutes.
BNB Smart Chain, Solana, and Polygon for Lower-Cost Transfers
BNB Smart Chain (BEP-20) works well if you already use the BNB ecosystem. Fees are usually low, around $0.03 to $0.30. One detail matters a lot here: BEP-20 addresses use the same "0x" format as ERC-20. That can trip people up, so always check the network label on the deposit page before sending.
Solana (SPL) is built for low cost and speed. Fees are usually under $0.01, and confirmations are close to instant. The catch is support: not every platform accepts USDT or USDC over Solana, so you need to verify that first.
Polygon is another low-fee option. It works with many Ethereum-compatible wallets and apps, and transfers usually cost about $0.01 to $0.05. Still, support depends on the platform, so don’t assume it’s available everywhere.
One last detail applies to all three networks: you need a small amount of the chain’s native token to pay gas fees.
- BNB for BNB Smart Chain
- SOL for Solana
- POL (formerly MATIC) for Polygon
No native token means no transfer - the transaction will fail.
A Simple Decision Framework for Choosing the Right Network
Before you buy, use the destination’s supported networks and the fee table above to pick the chain that makes sense. Start with the receiving wallet or exchange, then move through the checks below.
A 5-Step Checklist for Choosing the Right Network
- First, confirm what the recipient supports. Open the deposit page in the destination wallet or exchange and check the network options for that exact stablecoin.
- Match the address format. Treat the address format as a quick sanity check, but trust the deposit page first. If the format doesn’t line up, stop there.
- Compare the full cost, including fees. On smaller transfers, a high-fee network can eat up a big chunk of what you send. If you’re sending a modest amount, lower-cost networks like Tron, BNB Smart Chain, or Solana may make more sense.
- Verify your gas token balance. Make sure you hold the right gas token for the chain: ETH, TRX, BNB, SOL, or POL. If your balance is too low, the transaction won’t go through.
- Send a small test amount first. Start with $1 to $5. If you use the wrong network, the funds are often unrecoverable.
How Kryptonim Fits Into the Buying Process
At checkout, choose the network that matches the recipient’s deposit details. Before you confirm, check again that the network shown in Kryptonim matches the destination wallet or exchange.
Then paste the address and review it one more time. A simple habit helps here: compare the first four and last four characters before you confirm.
How to Avoid Wrong-Network Transfers and Other Costly Errors
Once you pick a network, pause and run a few checks before you hit confirm.
The rule is simple: the sending network must match the recipient's network exactly. If they don't match, your funds can become unrecoverable.
One mistake that catches a lot of beginners is address spoofing (address poisoning). Here's how it works: scammers send a tiny amount of crypto from a wallet address that looks almost identical to one you've used before. The goal is to trick you into copying that fake address from your transaction history later.
Don't take the bait. Always copy the address straight from the recipient's deposit page - never from your history.
Final Checks Before You Confirm a Purchase or Transfer
Use this last review to catch mistakes before they turn permanent.
Run through these five checks every time:
- The network matches exactly. The sending and receiving network labels need to be the same, letter for letter.
- Address format fits the network. Treat the address format like a quick gut check, not the final rule. Tron addresses start with
T. Ethereum and BNB Chain addresses start with0x. Solana uses a Solana address, which does not start with0x. - First and last four characters match. After you paste the address, check both ends with your eyes. This helps catch clipboard hijacking and plain copy mistakes.
- You have enough gas for the network. You need ETH, TRX, BNB, or SOL based on the chain you're using. Without it, the transaction won't go through.
- Memo or tag is included if required. Some deposits need a memo or tag. If you leave it out, the funds may not be credited.
For large transfers, send $1 to $5 first.
FAQs
What if I send stablecoins on the wrong network?
Sending stablecoins on the wrong network can lead to permanent loss of funds because most transfers can’t be reversed.
If the network you choose doesn’t match the receiving wallet or platform, the funds might not show up at all. In some cases, they can only be recovered through a complex process that may cost money and still may not work.
The safest move is simple: check that the network matches on both sides before you send anything.
How do I know which network my wallet supports?
Check your wallet’s network settings or interface to see which networks it supports. Look for the network label or token standard, such as ERC-20, TRC-20, or BEP-20.
Before you send or receive stablecoins, make sure the network you pick matches both the recipient’s supported network and the exchange’s network selection. If there’s a mismatch, your funds can end up lost or stuck.
If you’re not sure, check your wallet’s documentation or support resources before moving any money.
Which stablecoin network is best for beginners?
For most beginners, TRON (TRC-20) is usually the best pick. Fees stay low, often around $1 to $4, and confirmations tend to come through in about 3 to 5 seconds. That makes it a practical option for everyday transfers.
Ethereum (ERC-20) gives you broader compatibility and access to a larger DeFi ecosystem. The trade-off is cost. Fees are often higher - around $5 to $35 or more - so it’s usually a less suitable choice for beginners or for small transactions.