
How to Buy Crypto in the US and Send It to Your Own Wallet
Step-by-step guide to buying crypto in the U.S., navigating fees and holds, and safely withdrawing to your own wallet.
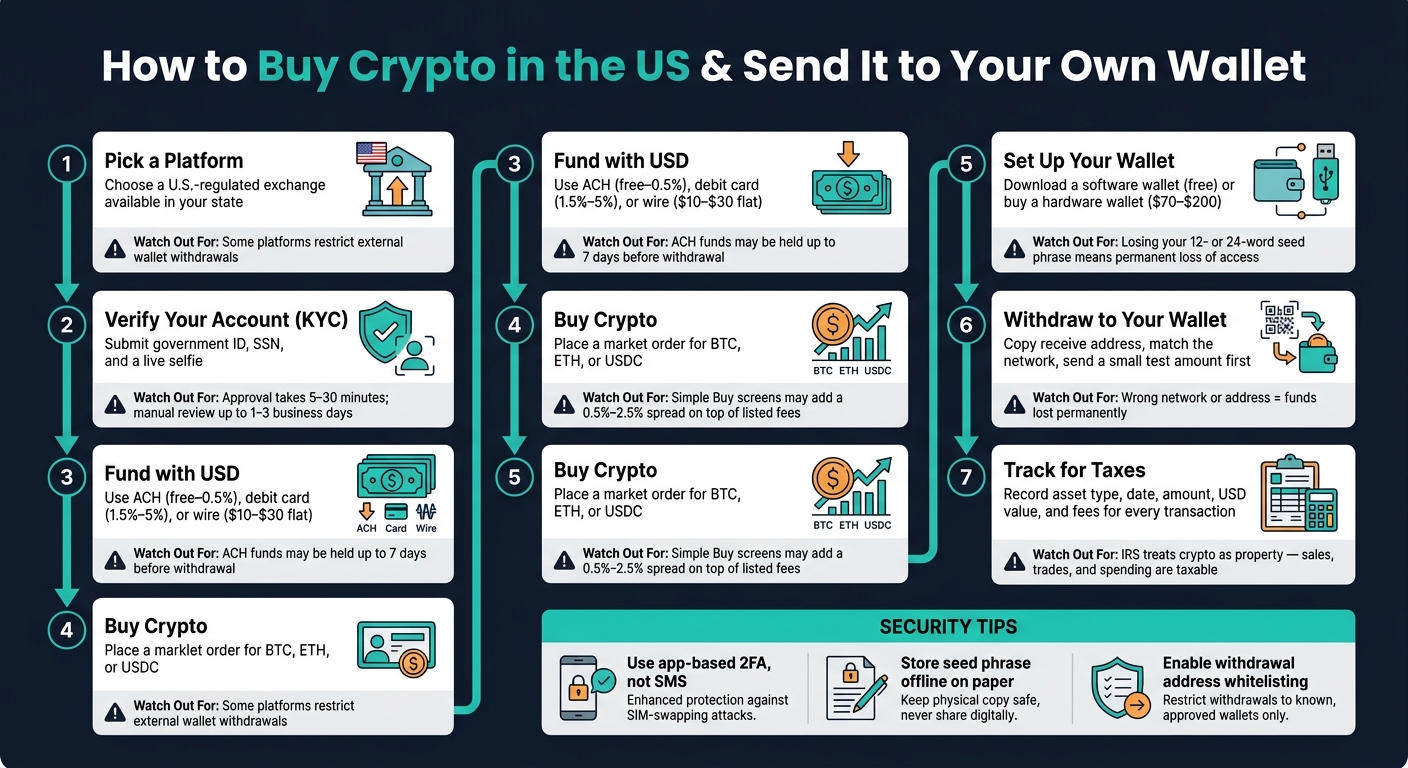
Buying crypto in the U.S. is simple: pick a U.S.-available exchange, pass ID checks, add USD, buy, and withdraw to your own wallet. The main risks are account holds, high fees, and sending on the wrong network.
Here’s the short version:
- I need a government ID, SSN, U.S. address, email, phone number, and bank account
- I should use a regulated exchange that works in my state and allows wallet withdrawals
- ACH is often the lowest-cost option, but funds may be held for up to 7 days
- Debit card buys are faster, but fees can run 1.5% to 5%
- A software wallet is free; a hardware wallet often costs $70 to $200
- Before sending, I need to match the coin and network
- I should always send a small test transaction first
- I need to keep tax records for buys, sales, trades, and fees
If I want the safest path, I turn on app-based 2FA, save my 12- or 24-word recovery phrase offline, and use address whitelisting when the exchange offers it.
A fast side-by-side view:
| Step | What I do | What to watch for |
|---|---|---|
| Pick a platform | Choose a U.S. exchange available in my state | Some platforms limit external withdrawals |
| Verify account | Submit ID, SSN, and selfie | Approval may take 5 to 30 minutes or 1 to 3 business days |
| Fund with USD | Use ACH, debit card, or wire | ACH may be cheap but delayed |
| Buy crypto | Purchase BTC, ETH, or USDC | Simple buy screens may add 0.5% to 2.5% spread |
| Set up wallet | Create software or hardware wallet | Losing the seed phrase means losing access |
| Withdraw | Paste address, match network, send test amount | Wrong address or network can lead to loss |
| Track records | Save date, amount, USD value, and fees | Crypto is taxed as property in the U.S. |
This article walks me through that process in plain English, with the main fees, delays, and safety checks up front.
How to Buy Crypto in the US and Send It to Your Wallet: Step-by-Step Guide
How to choose a crypto platform and set up your account
Before you deposit money, make sure the platform is U.S.-compliant, licensed in your state, and lets you withdraw to an external wallet.
That last part matters more than many beginners think. Some platforms make buying easy but put limits on moving your crypto out. So before you even start signing up, check two things: the platform supports your state, and it allows withdrawals to an external wallet.
How to set up an account on a regulated exchange
Create your account using your legal name, email, and a strong, one-of-a-kind password. You’ll also need to verify your identity with a photo ID, SSN, and a live selfie. In most cases, automated checks approve accounts in 5 to 30 minutes, though manual review for higher limits can take 1 to 3 business days.
After your identity is confirmed, turn on two-factor authentication before linking any payment method. Use an authenticator app like Google Authenticator or Authy, or a hardware key like a YubiKey. Skip SMS-based 2FA if you can, since it’s open to SIM-swap attacks.
Once 2FA is on, link your bank account through ACH or add a debit card. Then enable withdrawal address whitelisting. This setting blocks transfers to new addresses for 24 hours, which gives you an extra layer of account protection.
After your account is verified and locked down, you can fund it and place your first buy order.
How U.S. users can buy through Kryptonim
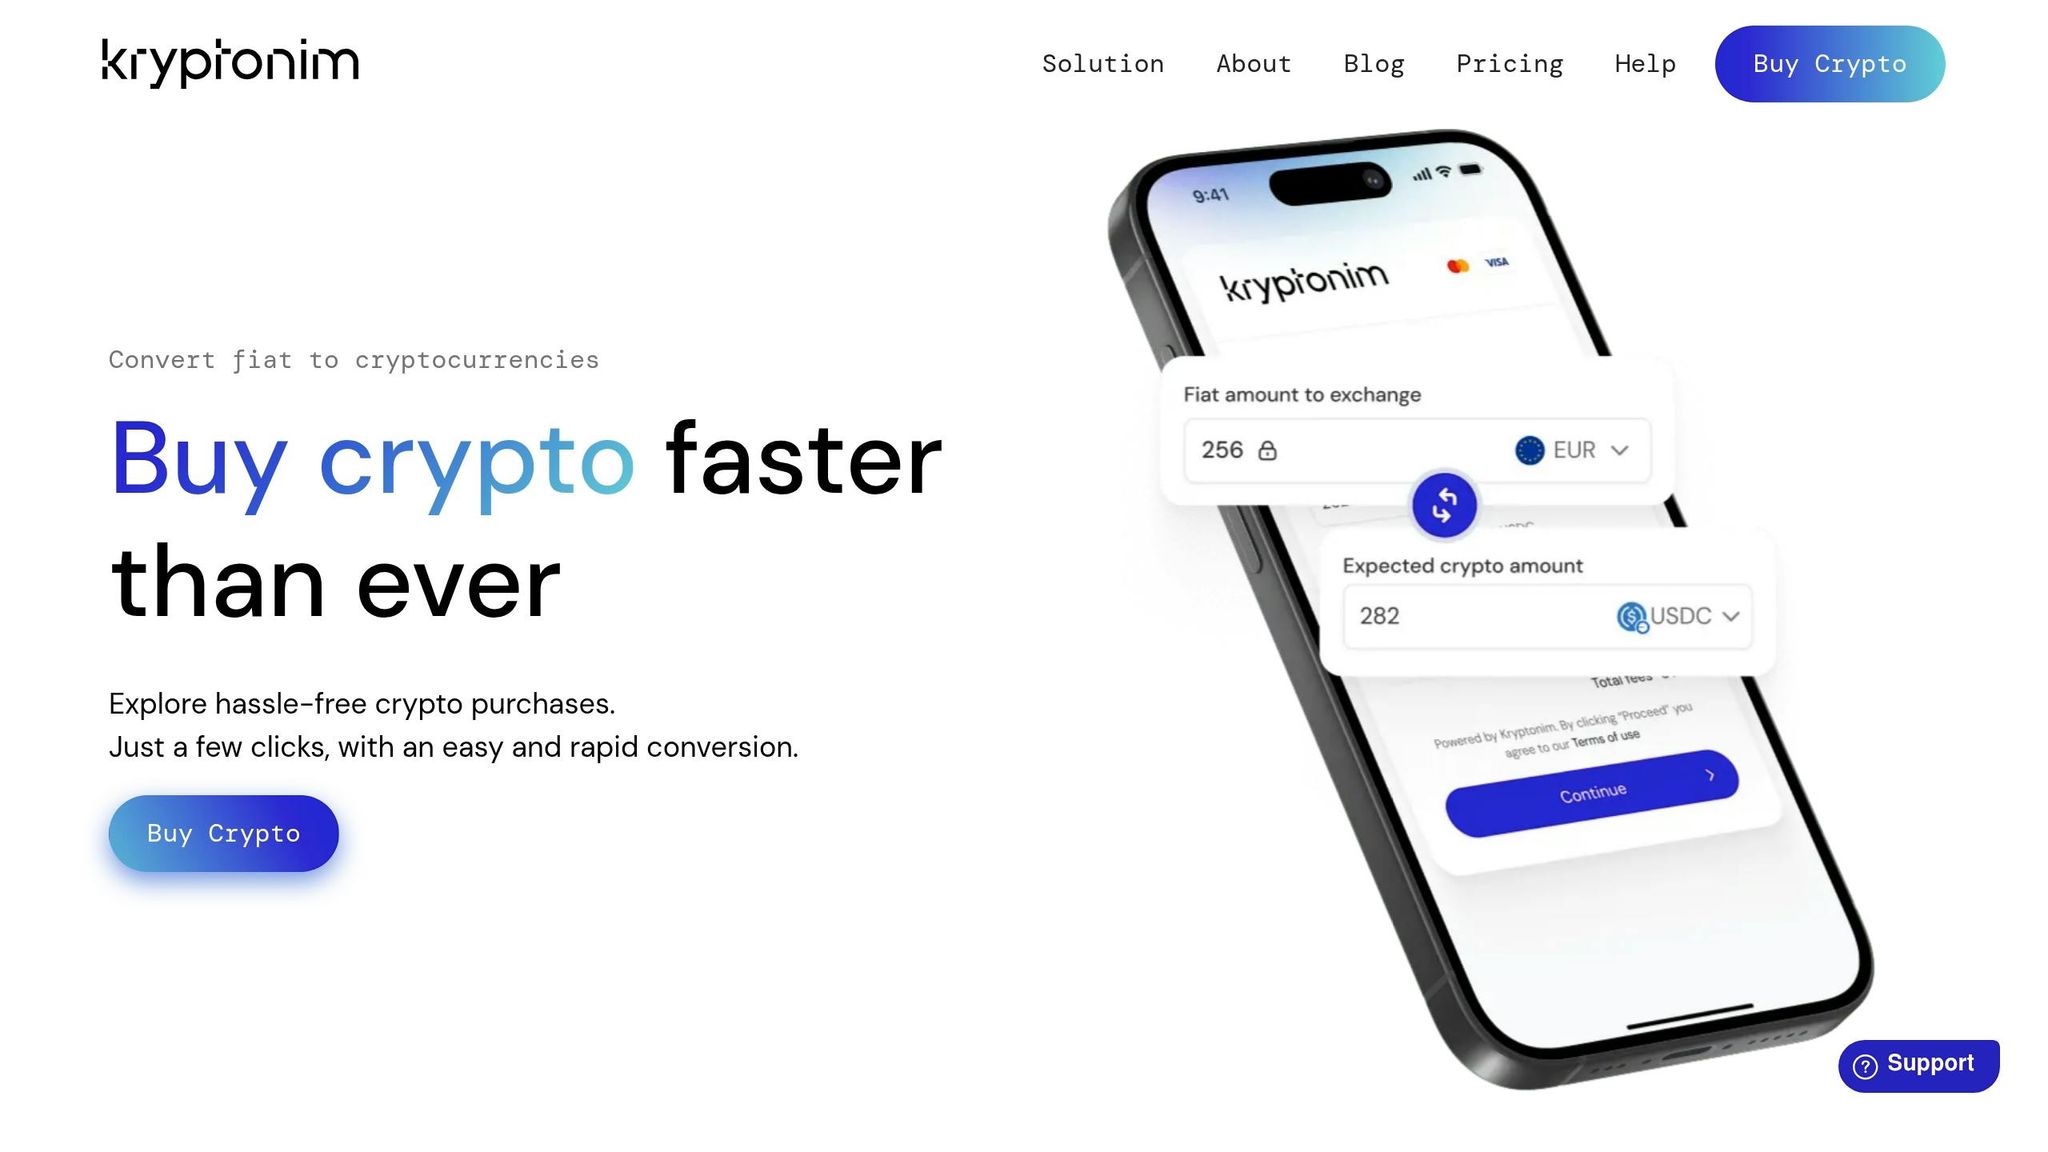
After verification, add USD and buy the crypto you want to move to your wallet.
sbb-itb-0796ce6
How to buy crypto with USD and what it will cost
How to fund your account and place a buy order
Once your account is verified and 2FA is on, the next step is adding USD. Most U.S. exchanges give you three main ways to do that: ACH bank transfer, debit card, and wire transfer. Each one has its own trade-off between speed and cost.
| Method | Speed | Typical Fees | Best Use Case |
|---|---|---|---|
| ACH Bank Transfer | 3–5 days (Trade may start before settlement) | Free to 0.5% | Best for most users; lowest cost |
| Debit Card | Instant | 1.5%–5% | Small, urgent purchases |
| Wire Transfer | Same or next day | $10–$30 flat | Large deposits over $10,000 |
For most people, ACH is the cheapest route. Some exchanges even let you start trading before the transfer fully clears. Debit cards are fast and easy, but the fees can sting. Wire transfers make more sense for bigger deposits.
After your purchase settles, go to the buy screen and pick Bitcoin (BTC), Ethereum (ETH), or USD Coin (USDC). If you're new to this, a market order is the easiest option. It buys right away at the best price available, so you don't need to set a target price or wait for the market to hit it.
Most exchanges split this process into two paths: a "Simple Buy" button and an "Advanced" or "Pro" screen. Simple Buy is easier to use, but it often adds a spread of 0.5% to 2.5% on top of the listed fee. The advanced screen usually comes with lower trading fees.
How to check fees, settlement time, and where your crypto goes
Before you hit confirm, check the preview screen closely. It should show:
- The total USD amount you're spending
- The fee or spread
- The exact amount of BTC, ETH, or USDC you'll get
If the quoted price looks a little high, compare it with a price aggregator like CoinGecko before you go through with the purchase. That's a simple way to spot a spread that may not be obvious at first glance.
Buying is only the first part. Getting your crypto out safely depends on settlement timing. Your crypto may show up in your exchange balance fast, but that doesn't always mean you can move it right away. The exchange can hold it until the USD deposit clears, and that can take as long as 7 days.
"While crypto purchases can sometimes appear to happen instantly, the underlying movement of money between your bank and the exchange can take days to fully clear." - Glenn Derene, Consumer Reports
It's smart to plan around that delay before trying to send funds to your own wallet. Once the buy settles, create your wallet address and start with a small test transfer first.
How to set up a wallet and send your crypto
How to create a software or hardware wallet
Once your crypto is ready to withdraw, move it to a self-custody wallet that you control. You can use a software wallet or a hardware wallet.
Software wallets are free apps for your phone or computer, like MetaMask or Trust Wallet. Hardware wallets keep your keys offline and usually cost $70 to $200.
| Feature | Software Wallet (e.g., MetaMask, Trust Wallet) | Hardware Wallet (e.g., Ledger) |
|---|---|---|
| Security | Moderate | High |
| Cost | Free to download | Upfront cost for the device |
| Best Fit | Frequent traders and DeFi users | Long-term holders and large balances |
If you're new to this, the core setup rules don't change. Download the wallet only from the official source, and save your recovery phrase offline.
During setup, you'll create a device password and get a 12- or 24-word recovery phrase. Write it down on paper and keep it offline in a secure place. If you lose that phrase, you lose access for good.
How to withdraw crypto to your own wallet without errors
Once your wallet is set up, it's time to move your crypto off the exchange. The big thing here is accuracy. One small mistake can be costly.
-
Copy your wallet's receive address
In your wallet app, tap Receive for the coin you want to transfer. Copy the address instead of typing it by hand. After you paste it, check that the first and last four characters match what your wallet shows. -
Open the withdraw screen and match the network
Pick the coin, paste your address, and make sure the network matches on both sides. If the network is wrong, your funds can be lost for good. -
Send a small test amount first
Before you move your full balance, send the minimum allowed amount. Then wait for that test transfer to confirm. -
Send the rest once the test clears
After the test goes through, return to the withdrawal screen and send the full amount. Check the network fee before you confirm.
After the transfer confirms, your crypto will be in your own wallet and ready for long-term storage.
Security, taxes, and a final checklist
How to protect your account, wallet, and recovery phrase
Your crypto is only as safe as your account and seed phrase. Start with your exchange account. Use a password that's at least 16 characters long, and turn on 2FA with an authenticator app, not SMS. SMS can be exposed in SIM-swap attacks.
Also, type exchange URLs directly into your browser. Don't click links from emails or DMs. Phishing sites often look almost identical to the real thing, and that's how people get caught.
Your seed phrase needs the same level of care you'd give cash or house keys. Anyone who has it can take your crypto. Write it down on paper and store it somewhere physically secure, like a fireproof safe. Don't save it in a notes app, screenshot, or cloud storage.
Exchanges are simpler to use. But a personal wallet gives you direct control of your keys.
Once your wallet has funds in it, lock down access and keep your records in order.
Key steps for U.S. buyers to remember
Use this checklist:
- Platform: Pick a U.S.-regulated exchange and make sure it's available in your state.
- Verification: Finish KYC using a government-issued ID and SSN.
- Funding: Use ACH if you want lower fees, or a debit card if you want faster access. Also check hold times. On some platforms, ACH deposits can take up to 7 days before funds are fully available.
- Wallet setup: Set up a software or hardware wallet and store the 12- to 24-word seed phrase offline.
- Network match: Double-check that the withdrawal network matches your receiving wallet's network before you send anything.
- Test transaction: Send a small amount first. After it confirms, send the rest.
- Tax records: Track the asset type, date and time, number of units, U.S. dollar value, and any fees paid.
Before you move on, save the details you'll need at tax time. The IRS treats crypto as property. That means sales, trades, and spending can be taxable. Transfers between wallets you control usually are not.
Keep your own records of the price, date, amount, and fees for each transaction.
FAQs
How long before I can withdraw my crypto?
It depends on the platform and the way you paid. Buying crypto can happen almost right away, but sending it to an external wallet is often a different story. Many exchanges place a hold on transfers until your payment fully clears.
Here’s how it usually works:
- ACH deposits tend to take 1 to 3 business days to settle.
- Debit card purchases often clear faster, usually within 72 hours or less.
- Some platforms let you withdraw as soon as the crypto shows up in your account.
That’s why two people can buy the same coin at the same time and still get very different transfer timelines. The purchase may be done, but the withdrawal window can still be closed for a bit.
Which network should I use for my withdrawal?
Use the network that fits your wallet and the crypto you’re sending, based on what your exchange supports. For example, BTC should go through the Bitcoin network, and ETH should go through the Ethereum network.
Before you withdraw, check network compatibility, the wallet address, fees, and transaction speed. Your exchange will show the withdrawal networks you can use.
Do I owe taxes when I move crypto to my own wallet?
Generally, no. Moving crypto between wallets you control is usually a non-taxable event as long as ownership does not change.
Taxes may apply if the transfer involves a sale, exchange, or other disposition that changes ownership or has economic value.